
Azure Application Service (App Service)
The Azure installation consists of an Azure client deployment package. The deployment package is installed on an Azure website connected to the application registration.
-
- On https://portal.azure.com/ , log in with your Windows Azure credentials (View screenshot 01 for reference).
- Create a website in Azure by creating a Web App.
- In Azure, select App Services.
- Select + Create.
- Select + Web App.
- Create a dedicated resource group (recommended).
- Select a name that is related to your company (Example: "[company name]-test").
- Under Publish, select Code.
- Under Runtime stack select the ASP.NET V4.8.
- Under Operating System select Windows.
- Under Region select the region related to the physical data centre on which the new mobile website is created.
- Under Pricing plans select your desired plan.
- Click Next until you reach the DEPLOYMENT tab.
- Under Basic authentication select Enable.
- Click Next until you reach the REVIEW + CREATE tab.
- Click on Create.
- Wait for the resource to deploy and navigate to the new App Service and click on Go to resource.
- In Overview, copy the URL of the default domain and add https:// at the beginning (View screenshot 02 for reference). You will need to use this in a later step.
- Create one or more virtual applications (View screenshot 03 for reference).
- Each Dynamics 365 for Finance and Operations environment requires a dedicated mobile client installation. You may have license for the Dynaway Work execution app, Dynaway Mobile safe work app, and Dynaway Planning & Scheduling Board app, each of which requires its own virtual application.
- Go to Settings > Configuration.
- Go to Path mappings.
- Click + New virtual application or directory.
- Under Virtual path input:
- /work for the work execution application.
- /scheduling for the scheduling board application.
- On https://portal.azure.com/ , log in with your Windows Azure credentials (View screenshot 01 for reference).
-
-
- Under Physical path input:
- site\wwwroot\work for the work execution application.
- site\wwwroot\scheduling for the scheduling board application.
- Uncheck the Directory checkbox (See screenshots below for an example).
- Under Physical path input:
-
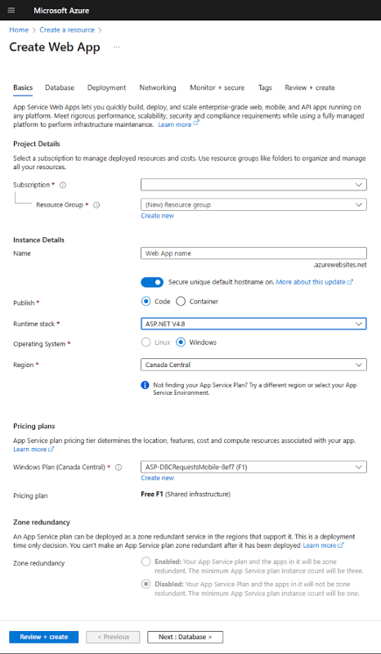
01: Create web app.
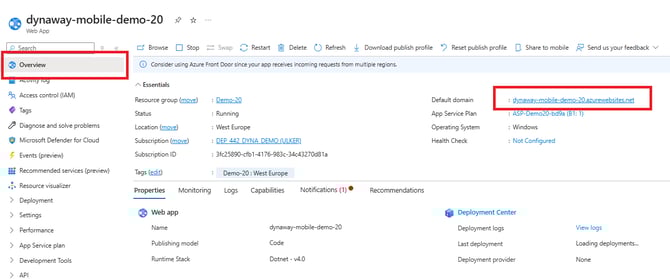 02: Copy the value and add https://.
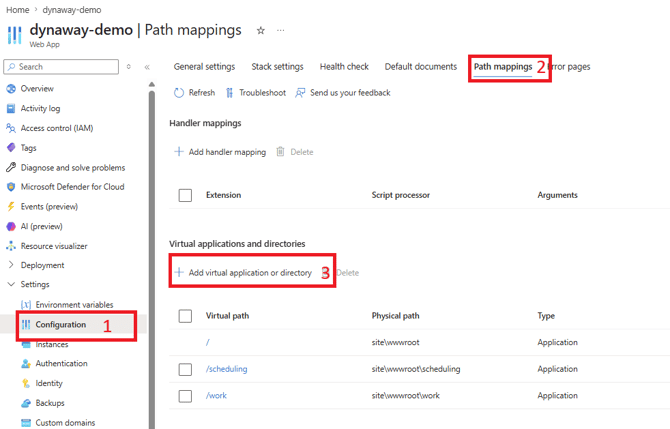
03:
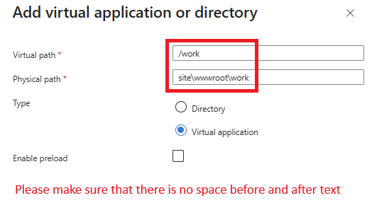
04:
Web Application Registration (App registrations)
Before you set up the Azure mobile site for the Mobile Client, you must first make a web application registration. The Azure web application registration ensures that the Mobile Client web app has security permissions to access Dynamics 365 for Finance and Operations.
Some steps regarding creating a web application registration require that you're set up as an 'Azure Global Administrator'.
Refer to this article from Microsoft for more information on how the Mobile Client is integrated with the Azure Active Directory https://docs.microsoft.com/en-us/azure/active-directory/develop/quickstart-register-app.
- Select the link https://portal.azure.com to open Microsoft Azure Dashboard.
- Navigate to Azure Active Directory.
- Select App registrations, and select the New registration button.
- In the Name field, insert the name of your Mobile Client. Examples: "Mobile AM Prod" and "Mobile AM Test-01".
- Select "Single-page application (SPA)" in the drop-down.
This URL must be the same as when setting up the Azure Mobile Site, described in the article Add the Azure app, taken from "Overview" and added https:// - Select Register and wait for the resource to deploy.
- Navigate to App registrations settings.
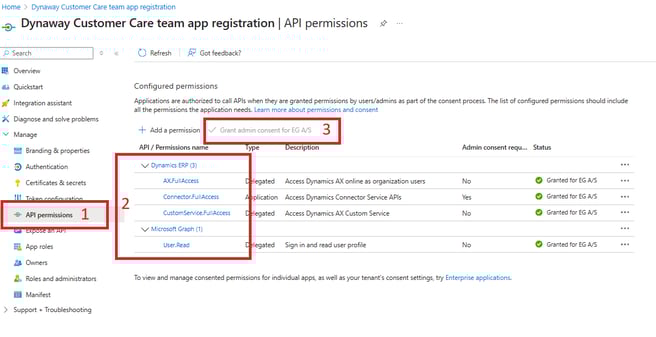
- Select API permissions from the settings menu
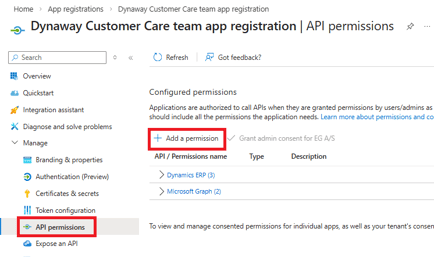
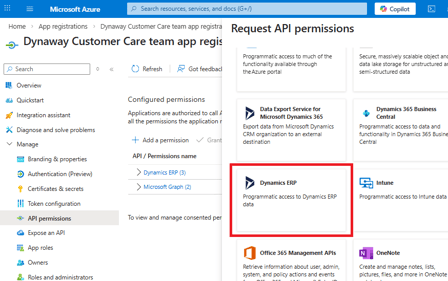
- Select Add permission > Dynamics ERP (see screenshot 01,02,03,04,05).
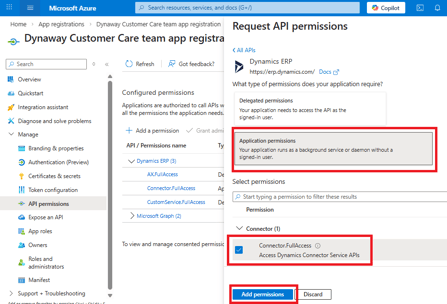
- Select Application permissions.
- Select one permission: Connector.FullAccess.
- Select Add permission.
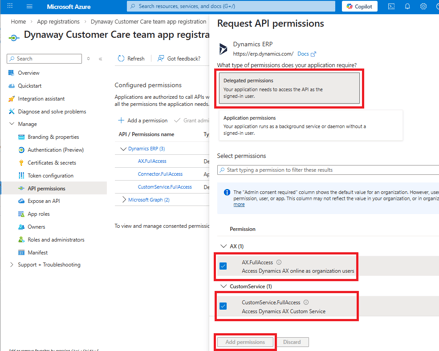
- Select Add permission > Microsoft Dynamics ERP.
- Select Delegated permissions.
- Select two permissions: AX.FullAccess and CustomService.FullAccess.
- In API permissions > Grant consent, select Grant admin consent for... and select "Yes" on the pop-up screen. This step requires you to be an 'Azure Global Administrator'.
- Select Overview from the settings menu.
- Find and copy the Application (client) ID for your mobile client application. You'll use this Application ID to set up the Azure mobile site, described in the article Add the Azure app.
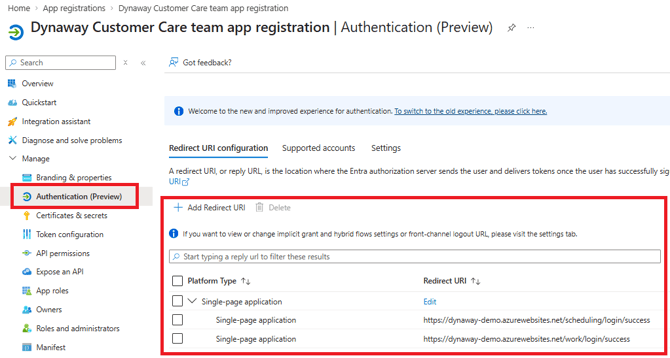
- Go to Manage > Authentication and,
- Under Single-page authentication > Redirect URLs, add the redirect URLs as below (see screenshot 02):
- https://[company] name-dev.azurewebsites.net/work/login/success
- https://[company] name-dev.azurewebsites.net/scheduling/login success
- Under Implicit grant and hybrid flows (see screenshot 06) enable the checkboxes corresponding to Access tokens (used for implicit flows) and ID tokens (used for implicit and hybrid flows).
- Under Single-page authentication > Redirect URLs, add the redirect URLs as below (see screenshot 02):
01: Select '+ Add a permission' in App registrations/Manage/API permission
01:
02: Select Dynamics ERP
02:
03: Select Delegated permissions mark Connector.FullAccess click Add permissions
03:
04: Select Delegated permissions mark AX.FullAcess and CustomService.FullAccess click Add permissions
04:
05: Grant admin consent for (company name)
 05:
05:
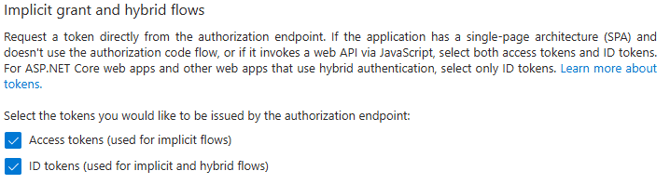 06: Enable options for 'Implicit grant and hybrid flows'.