
Installing new or upgrading from existing
When installing the Dynaway mobile applications, there are a couple of different installation scenarios, that we need to cover:
New customer with new installation (Dynaway AM/EAM 2610.1)
This is for completely new installation who have not installed Dynaway mobile applications before.
For these installations, we provide the installation package and you follow this installation guide step-by-step.
You need to be aware of that one step may require a person with Global Administrator role in Azure Portal to approve the App registration. This is also highlighted and conveyed by the installer with direct link and information for the Global Administrator.
Existing customer with new installation
This is for the existing installation upgrading from 2607.1 (or earlier) to 2610.1 (or later).
We provide the installation package and they follow the installation guide step-by-step.
They will most likely not need to have a person with Global Administrator role in Azure Portal do anything, as they can reuse the existing App registration - which is also the recommended approach.
Existing customer upgrading existing installation
This is for installation who have already have installed version 2610.1 or later and are upgrading to a newer version.
For these installation, we simply provide you with the installation package and assume that you followed this guide for the initial installation, so that they have a file "dmo-config.json" with all the values provided for that first installation. If not they will need to enter all relevant values again.
This will most likely not need to have a person with Global Administrator role in Azure Portal do anything, as they should just reuse their existing App registration.
Following is both the installation guide for new installations and the installation guide for upgrading.
Dynaway DMO (Dynaway Mobile Client) - New Installation
Welcome! This guide walks you through installing the Dynaway Mobile Client (DMO) server and mobile applications into your own Azure subscription, using the guided installation wizard.
It's written for anyone setting up DMO for the first time — whether you're a brand-new customer, or an existing customer using this installation process for the first time. No prior Azure experience is required; the installer guides you through every step.
There is one step you can't do yourself: a final "grant permissions" click that must be performed by a Global Administrator in your organization. The installer prepares everything for this and gives you a link to send them — more on that in Step 4.
Looking for a scripted / unattended installation instead? An advanced installation path exists for IT teams who want to fully script or automate the install (no prompts). It's covered in the accompanying README.md in your installation bundle. We only recommend this route if you're already comfortable with the values it asks for — if anything in this guide is unclear, stick with the guided wizard below.
Before you start
Please make sure you have the following ready. Having these on hand before you begin will make the install go smoothly.
On your machine
|
Requirement |
How to check / get it |
|
A Windows or macOS/Linux machine with internet access to Azure |
|
|
PowerShell 7 or later |
Check with pwsh --version. Windows' built-in "Windows PowerShell" (version 5.1) is not enough — install PowerShell 7 from https://aka.ms/powershell if needed. |
|
Azure PowerShell modules (Az.Accounts, Az.Resources, Az.Websites) |
You don't need to install these yourself — the installer checks for them and offers to install any that are missing. |
|
The Bicep CLI |
Also checked and installed automatically by the installer if missing. macOS/Linux users should have the Azure CLI installed beforehand (instructions here). Note: installing the Azure CLI itself requires elevated (administrator) rights on your machine. The installer will attempt this automatically, but it may fail if you don't have those rights — in that case, ask your IT department to install the Azure CLI for you beforehand, or run the installer from an elevated PowerShell session. |
|
Your installation bundle |
The folder you received, containing Install-Dmo.ps1, main.bicep, your package .zip, and the README. Keep everything together in one folder. |
Access and permissions
|
Requirement |
Notes |
|
Microsoft Entra ID rights |
If you'll let the installer create a new app registration (the default), you need Application Administratoror Cloud Application Administratorrights. If you're reusing an existing app registration, you only need to be an Owner of that specific registration. |
|
Azure subscription access |
Minimum: Contributoron the target resource group. If the resource group doesn't exist yet, you'll need Contributor at the subscription level so the installer can create it. |
|
A Global Administrator, identified in advance |
This person doesn't need to run the installer, but you will need to send them a link near the end of the process. Knowing who this is beforehand saves time. |
|
(Only if using AI features or the Enhanced barcode/QR scanner)Key Vault permissions |
You'll need Owner, User Access Administrator, orRole Based Access Control Administratoron the Key Vault (Contributor is not sufficient for this). If you don't have this, the installation still completes — you'll just need to grant access manually afterward. |
Information to have on hand
Ask your organization's IT department or IT/D365 implementation partner (sometimes called your project partner or Microsoft partner) for:
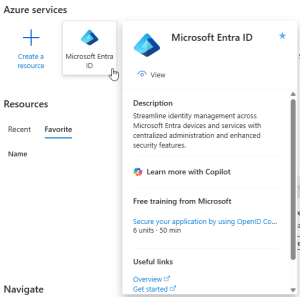
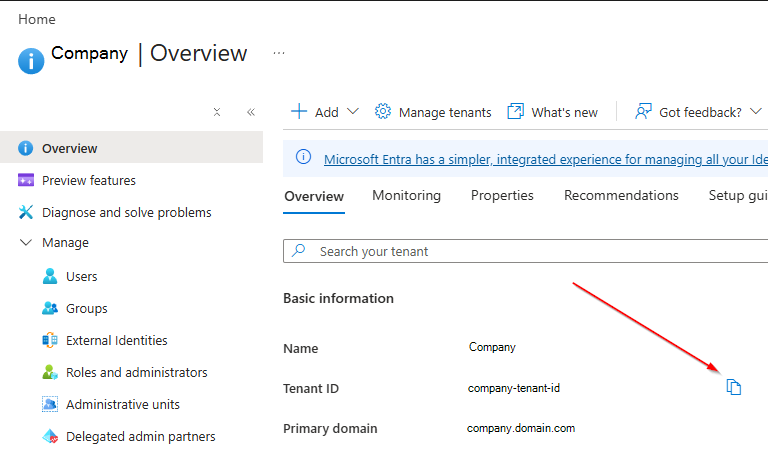
- Your Azure Tenant ID
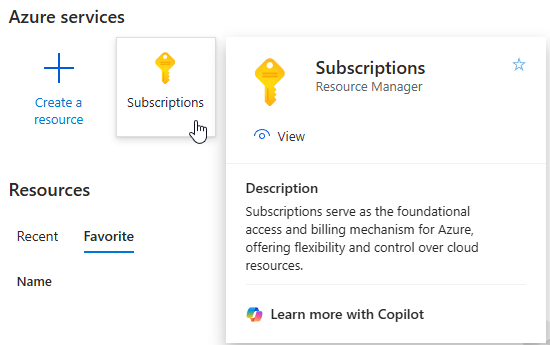
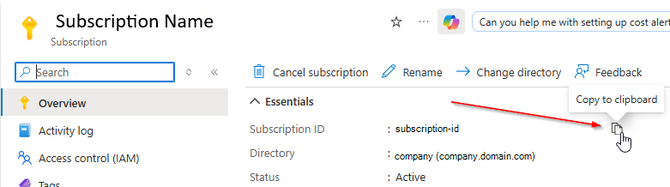
- Your Azure Subscription ID
- Your DFO (Dynamics 365 Finance and Operations) domain (e.g. https://contoso.operations.dynamics.com)
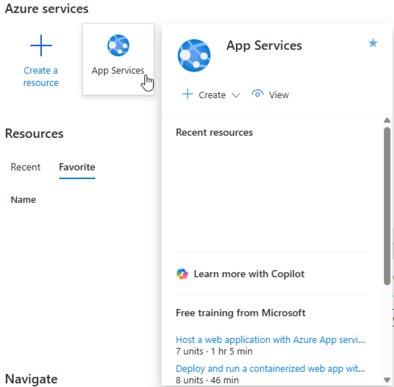
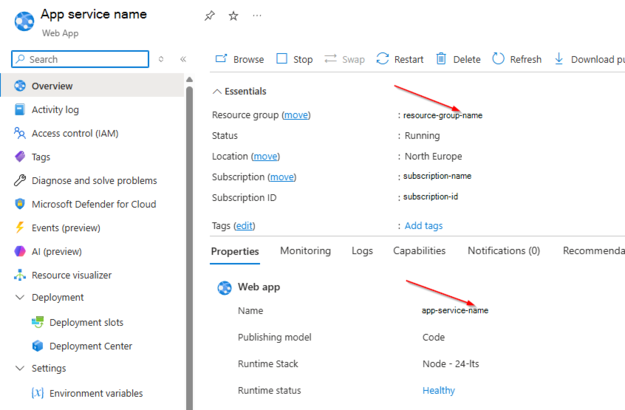
- (Only if reusing an existing Azure App Service) The App Service name and its Resource group name
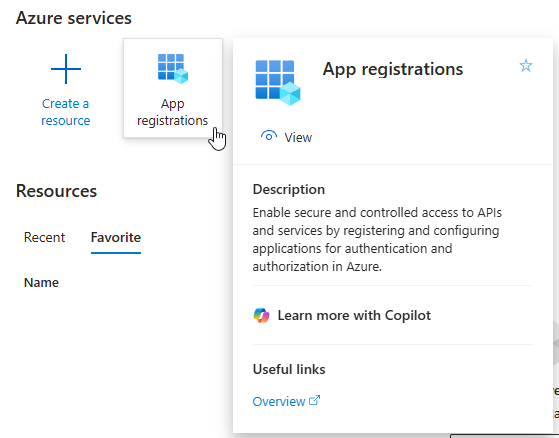
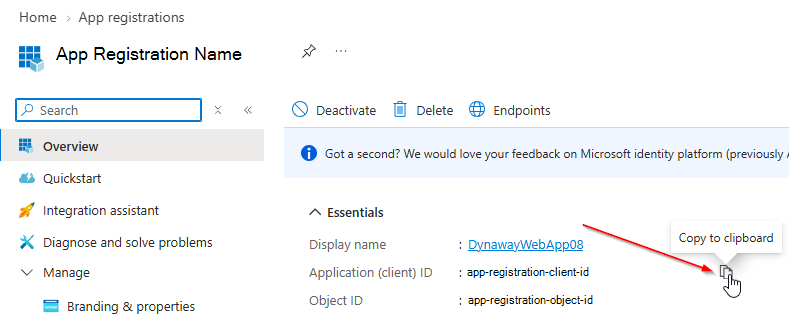
- (Only if reusing an existing Azure App registration) The App registration's Client ID
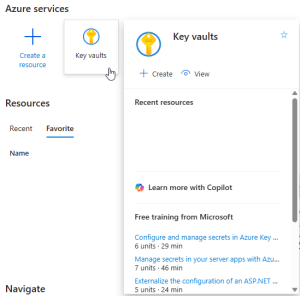
- (Optional) Your Key Vault name or URL — only needed if you plan to use AI features or the Enhanced barcode/QR scanner. You can skip this and add it later. (Note: what to actually store in the Key Vault is a separate, post-installation configuration step, and outside the scope of this guide — your Dynaway contact can help with that afterward.)
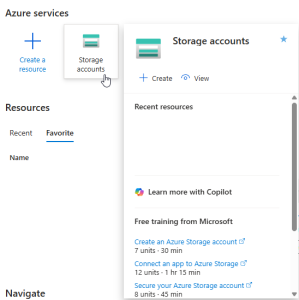
- (Optional) A blob storage account name and access key — only needed if your setup stores documents in blob storage. You can skip this and add it later. Treat this key like a password.
Tenant ID
Subscription ID
App service name and Resource group name
App registration client ID
Key vault URL

Blob storage (If used)
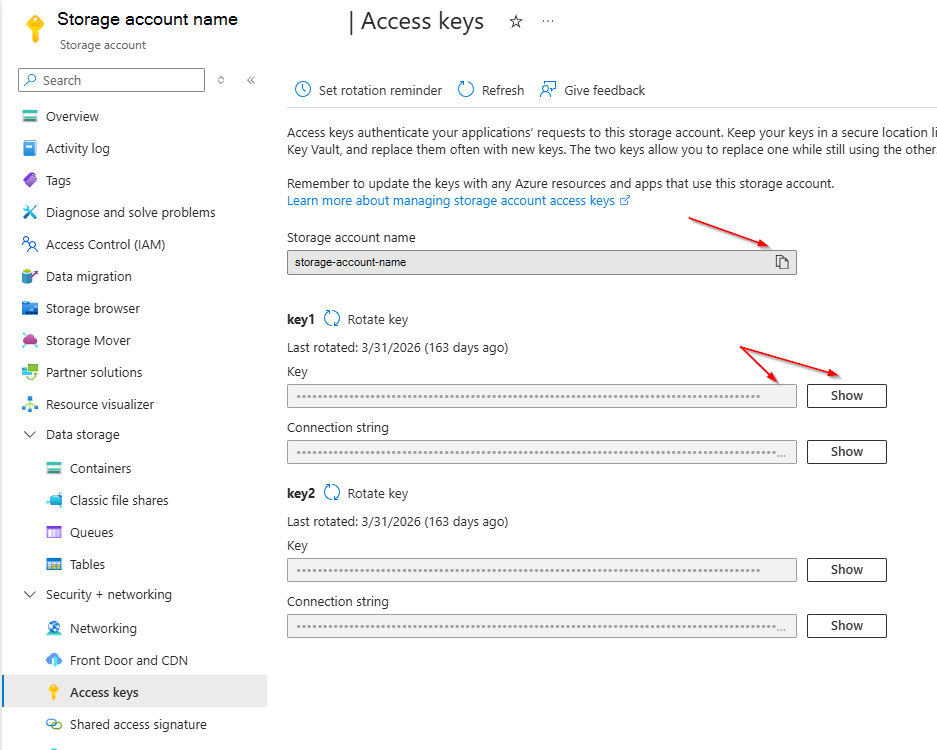
Step 1: Open PowerShell and go to your bundle folder
Open PowerShell 7 and navigate into the folder containing your installation bundle:
cd C:\dmo-install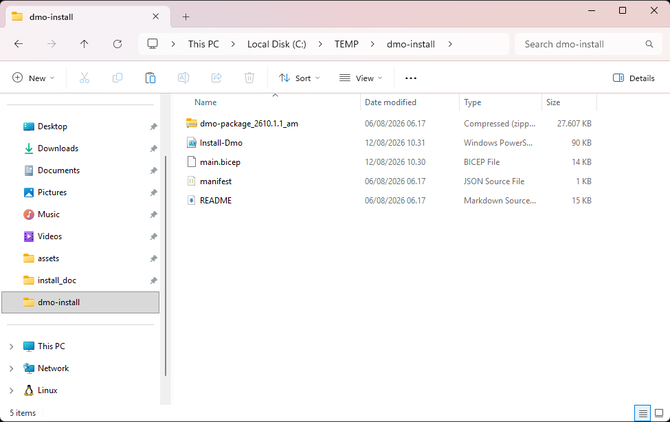
Step 2: Run the installer
Run the installer with no extra input, and simply answer the questions it asks:
.\Install-Dmo.ps1
The wizard will ask you for:
- Your Azure subscription
- A short name for the installation (this becomes part of your site's web address — e.g. dmo-contoso-prod)
- Your DFO (Dynaway Finance & Operation) domain
- Optionally, a Key Vault and/or blob storage details
Tip: Choose a short, lowercase name. If it's already taken by someone else in Azure, the installer will automatically add a few unique characters and let you know the final address — you don't need to do anything extra.
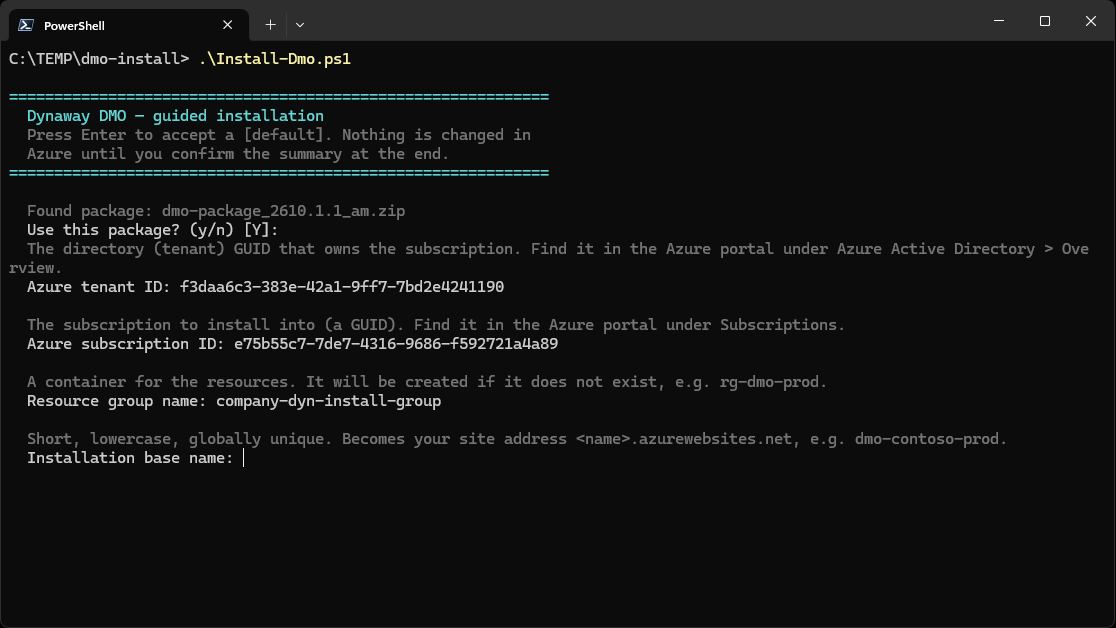
The installer then signs you in, creates the necessary Azure resources, deploys the package, and configures everything automatically. This usually takes a few minutes, but can sometimes take a bit longer depending on your Azure environment — this is normal.
When it finishes, it will print:
- Your site address
- A consent link to send to your Global Administrator
- A short summary of what was created
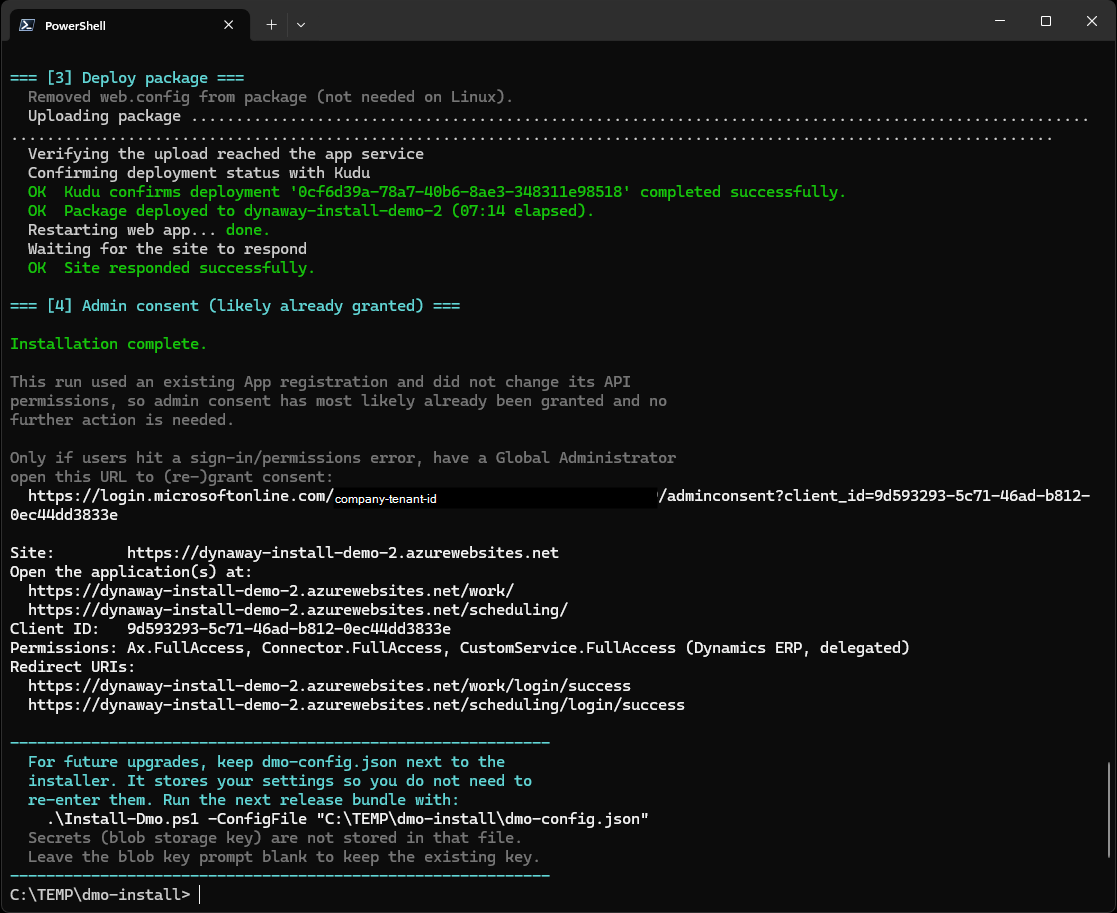
Your installation is not yet usable. Continue to Step 3 to complete the one manual step.
Step 3: Send the consent link to your Global Administrator
The DMO application needs permission to talk to Dynamics 365 on your users' behalf. Granting this can only be done by a Global Administrator (or Privileged Role Administrator) — usually not the same person who ran the installer.
Using an existing App registration? If you reused an existing App registration during installation, it has most likely already been granted consent previously, and you can skip this step. The installer will only print a consent link if one is actually needed.
The link looks like this:
https://login.microsoftonline.com/<tenant>/adminconsent?client_id=<id>
Send this link to your Global Administrator. When they open it, sign in, and click Accept, permission is granted. This is a one-time step — you won't need to repeat it for future updates to this installation.
Until this step is completed, anyone opening the site will see a sign-in or permission error. That's expected, and it clears up automatically once consent is granted.
Step 4: Verify your installation
- Open your site address in a browser: https://<your-name>.azurewebsites.net/<app-name>/ (your Dynaway project contact can confirm the exact app path).
- You should reach the application's sign-in page.
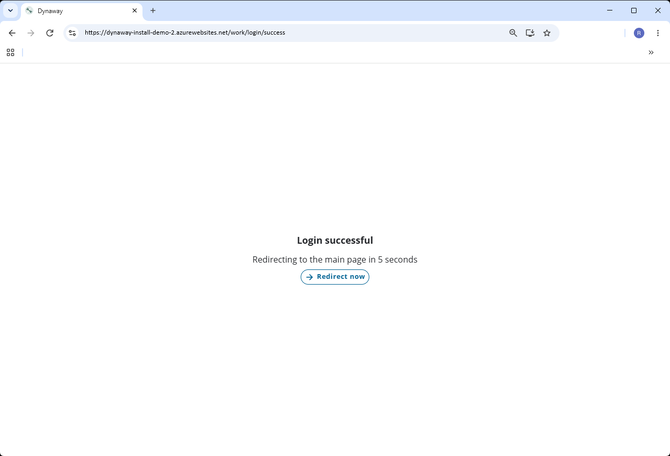
Give it a little time. It can take a while after installation for the application to be fully up and running — if the site doesn't load right away, wait a few minutes and try again before assuming something is wrong.
If you instead see a blank page or an error immediately after install, it's almost always because the consent step (Step 3) hasn't been completed yet, or a required value was missing — see Troubleshooting below.
Troubleshooting
|
If you see… |
It likely means… |
|
A resource can't be reached, or a download is blocked |
Your organisation's network may be restricting outbound access. Contact whoever manages your network settings. |
|
"Could not automatically grant access to the Key Vault" |
Your account likely lacks the right Key Vault permissions (see prerequisites above). The rest of the install still completed; the installer will print the manual steps needed, or your vault owner can grant them. |
|
A message that the site name is already taken |
The installer automatically picks a unique alternative name and tells you the final address — no action needed. |
|
A sign-in or permission error on the site |
The consent step (Step 3) hasn't been completed by your Global Administrator yet. |
|
A message that a required tool (PowerShell module, Bicep, Azure CLI) is missing |
In most cases the installer offers to install it for you automatically — just answer y when prompted. |
|
A message that you lack rights to create an app registration |
Expected if you're not a directory administrator. You can supply an existing app registration ID instead, or ask an admin to create one — contact your Dynaway representative for guidance. |
|
A blank page or an error right after installing |
A required value (often the DFO domain) was missing or incorrect, or blob storage details were wrong. Re-run the installer with the correct values. |
If something isn't covered here, save the full output shown in PowerShell and reach out to your Dynaway representative — that output tells us exactly what happened.
Need help?
Contact your Dynaway representative if you run into anything unexpected during installation.
Dynaway DMO — Update Installation Guide
This guide walks you through updating an existing Dynaway DMO installation to a new release, using the guided installation wizard.
It assumes you have previously installed DMO using the guided installer and already have a dmo-config.json file from that installation. If you're installing DMO for the first time, please use the New Installation Guide instead.
Looking for a scripted / unattended update instead? An advanced, scriptable update path also exists for IT teams who prefer to automate this. It's covered in the accompanying README.md in your installation bundle. We only recommend this route if you're already comfortable with the values it asks for — if anything in this guide is unclear, stick with the guided wizard below.
Before you start
|
What you need |
Notes |
|
Your new release bundle |
The folder you received for this release, containing Install-Dmo.ps1, main.bicep, the new package .zip, and the README. |
|
Your dmo-config.json file from the previous installation |
Found in your previous bundle folder. Copy it into the new bundle folder before you start — the installer reads it automatically and skips every question it can already answer. |
|
Your blob storage key, if you use blob storage |
The config file doesn't store secrets, so you may be asked for this again. If you don't have it to hand, you can leave the prompt blank (see Step 2). |
|
PowerShell 7 or later |
Same requirement as for a new install — check with pwsh --version. |
You do not need to gather your DFO domain, Key Vault, or other settings again — these are all carried over automatically from dmo-config.json.
Step 1: Copy your config file into the new bundle
Copy dmo-config.json from your previous installation folder into the new release folder, so it sits next to Install-Dmo.ps1.
📸 Add a screenshot here: File Explorer showing dmo-config.json copied alongside Install-Dmo.ps1 in the new bundle folder — helps customers confirm they placed it correctly.
Step 2: Run the installer
Open PowerShell 7, navigate to the new bundle folder, and run the installer with no extra input:
cd C:\dmo-install-<new-version>
.\Install-Dmo.ps1
Because your settings are already known from dmo-config.json, the wizard will only prompt you for anything that's still missing or has changed. With a complete config file, you'll be taken straight to a confirmation screen showing your existing settings — just press Enter to proceed.
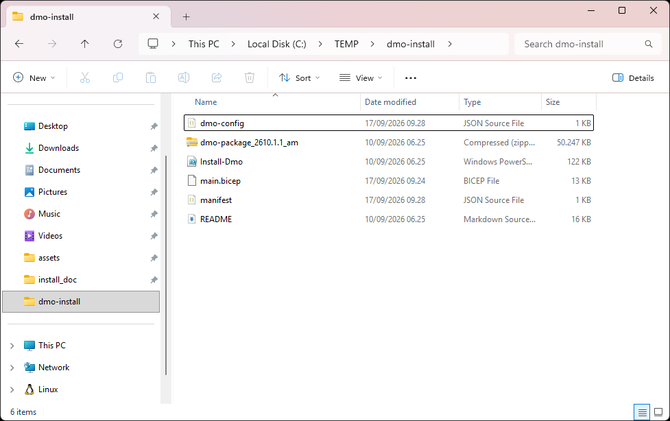
A couple of things to know as you go through this:
- Blob storage key: if you use blob storage, you may be asked for the key again (it isn't stored in the config file). Leave this blank and press Enter to keep the key already configured in Azure — you only need to re-enter it if the key has actually changed.
- Key Vault access: if your Key Vault setting hasn't changed since your last install, this step is skipped automatically — you won't see a repeated prompt or delay.
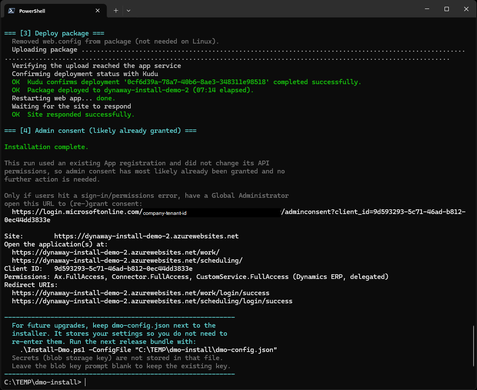
Step 3: Verify your installation
- Open your site address in a browser, as before.
- Confirm you can reach the application's sign-in page as expected, and that everything behaves as it did before the update.
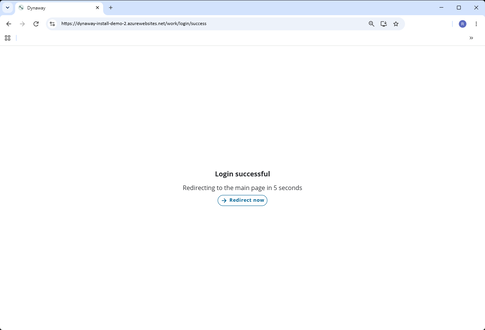
You do not need to repeat the admin consent step from your original installation — that was a one-time step and remains valid for future updates.
Troubleshooting
|
If you see… |
It likely means… |
|
The wizard asks questions you expected it to already know |
Your dmo-config.json may not have been copied into the new bundle folder, or is incomplete. Double-check it's present next to Install-Dmo.ps1. |
|
You're asked for a blob storage key you don't have |
Leave the prompt blank and press Enter — this keeps the existing key already stored in Azure. Only provide a new key if it has changed. |
|
A blank page or an error right after updating |
A required value was missing or incorrect. Re-run the installer, checking your dmo-config.json and any values you entered. |
|
A message that a required tool (PowerShell module, Bicep, Azure CLI) is missing |
The installer offers to install it automatically — answer y when prompted. |
|
A resource can't be reached, or a download is blocked |
Your organisation's network may be restricting outbound access. Contact whoever manages your network settings. |
If something isn't covered here, save the full output shown in PowerShell and reach out to your Dynaway representative — that output tells us exactly what happened.
Need help?
Contact your Dynaway representative if you run into anything unexpected during the update.