Introduction
This section describes the steps required to deploy a mobile website, which is used on the Mobile Clients.
Prerequisites
You have completed mobile setup for D365FO, as described in the section above.
Audience
Sysadmin, Partner Consultant
Deployment Scenarios
Scenario 1
The first time you deploy a mobile website, follow the steps described in the four articles below in sequential order:
- Open the mobile app registrering
- Create an Azure storage account (optional - only required if you want to manage large files on the Mobile Client)
- Add the Azure app (App Service)
- Web application registration on Azure Active Directory
- Configure and upload the mobile site:
- Configure the mobile site
- Configure attachments
- Upload the mobile site
When you create Azure resources, we recommend that you create a dedicated resource group for each purpose (example: one resource group for development and test, and one resource group for production).
Scenario 2
If you upgrade a mobile website from version 2008.0 or a previous version, do the following:
- Open the mobile app registration.
- Go to Authentication.
- You see a link on the Web tab with a text similar to "This app has implicit grant settings enabled. If you are using any of these URIs in a SPA with MSAL.js 2.0, you should migrate URIs". Select the link and follow the steps.
- Proceed with steps 9-10 in the step-by-step procedure in the article Web application registration to complete the upgrade process.
- Configure and upload mobile site:
- Configure the mobile site
- Configure attachments
- Upload the mobile site
 Scenario 2 > Step 3: Migrate URIs
Acquire License file
If you want to install Dynaway Mobile for AM, first you must acquire a license file. In order to acquire a Dynaway Mobile license file for AM in Dynamics 365 for Finance and Operations, send an email to help@dynaway.com and provide the following version information:
- License holder name
- Serial number of Dynamics 365 for Finance and Operations
- Product version number of Dynamics 365 for Finance and Operations
Find this information in Dynamics 365 for Finance and Operations by selecting
Help & Support (the question mark icon in the upper-right corner of the application) > About.
If you update your Dynaway Mobile solution from an older version to a newer version, the license file may also need to be updated due to certificate updates.
Create an Azure Storage Account
This step is optional.
An Azure storage account is required for interfacing with Dynamics 365 for Finance and Operations environments. The storage account is used as a temporary storage when uploading attachments from the mobile devices, such as images and pdf files. The storage account is only required if you want to manage large files on the Mobile Client.
If you're going to use attachments that are less than 20 MB in size per file, skip this section. You only need to create an Azure storage account if you expect to use attachments with a file size larger than 20 MB per file on the Mobile Client.
For additional information about Azure Blob storage setup and file size limitations, refer to the "appSettings" table and the text below the table in the article Configure the mobile site. The following app settings must be left blank if you skip the setup in this section:
- ax7StorageAccountName
- ax7StorageAccountKey
In a cloud hosted environment (T1), for DEV and TEST purposes, the General-purpose Azure storage account that is deployed with the Dynamics 365 for Finance and Operations environment can be used. Typically, the storage account can be identified by the resource group associated with the Azure environment.
- Navigate to Storage accounts.
- Select Add. These are the recommended settings:
- Storage account type: General-purpose
- Replication: Locally redundant storage (LRS)
Add Azure Application Service (App Service)
The Azure installation consists of an Azure client deployment package. The deployment package is installed on an Azure website connected to the application registration.
- On https://portal.azure.com/ , log in with your Windows Azure credentials (View screenshot 01 for reference).
- Create a website in Azure by creating a Web App.
- In Azure, select App Services.
- Select + Create.
- Select + Web App.
- Create a dedicated resource group (recommended).
- Select a name that is related to your company (Example: "[company name]-test").
- Under Publish, select Code.
- Under Runtime stack select the ASP.NET V4.8.
- Under Operating System select Windows.
- Under Region select the region related to the physical data centre on which the new mobile website is created.
- Under Pricing plans select your desired plan.
- Click Next until you reach the DEPLOYMENT tab.
- Under Basic authentication select Enable.
- Click Next until you reach the REVIEW + CREATE tab.
- Click on Create.
- Wait for the resource to deploy and navigate to the new App Service and click on Go to resource.
- In Overview, copy the URL of the default domain and add https:// at the beginning (View screenshot 02 for reference). You will need to use this in a later step.
- Create one or more virtual applications (View screenshot 03 for reference).
- Each Dynamics 365 for Finance and Operations environment requires a dedicated mobile client installation. You may have license for the Dynaway Work execution app, Dynaway Mobile safe work app, and Dynaway Planning & Scheduling Board app, each of which requires its own virtual application.
- Go to Settings > Configuration.
- Go to Path mappings.
- Click + New virtual application or directory.
- Under Virtual path input:
- /work for the work execution application.
- /scheduling for the scheduling board application.
-
- Under Physical path input:
- site\wwwroot\work for the work execution application.
- site\wwwroot\scheduling for the scheduling board application.
- Under Physical path input:
-
- Uncheck the Directory checkbox (See screenshots below for an example).
- Go to Deployment > Deployment center.
- Go to FTPS credentials.
- Copy the FTPS endpoint, FTPS Username, and Password.
- Connect with the FTP Server (View screenshot 04 for reference).
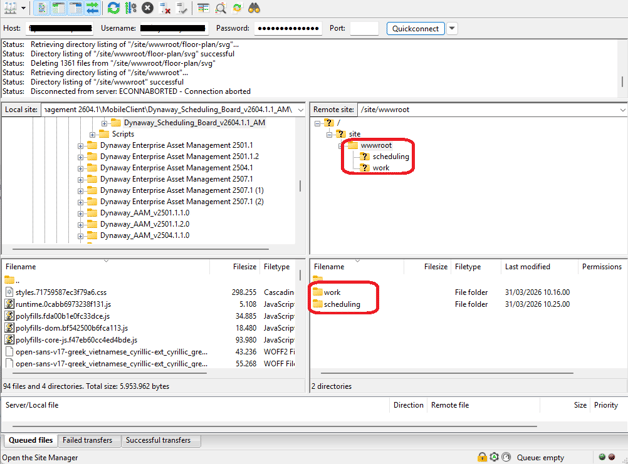
- Navigate to site\wwwroot.
- Create directories as required.
- work for the work execution application.
- safe for the scheduling board application.

01: Create web app.
 02: Copy the value and add https://.
 03: Create virtual applications.
04: Connect with FTP Server and create two folders.
Web Application Registration (App registrations)
Before you set up the Azure mobile site for the Mobile Client, you must first make a web application registration. The Azure web application registration ensures that the Mobile Client web app has security permissions to access Dynamics 365 for Finance and Operations.
Some steps regarding creating a web application registration require that you're set up as an 'Azure Global Administrator'.
Refer to this article from Microsoft for more information on how the Mobile Client is integrated with the Azure Active Directory https://docs.microsoft.com/en-us/azure/active-directory/develop/quickstart-register-app.
- Select the link https://portal.azure.com to open Microsoft Azure Dashboard.
- Navigate to Azure Active Directory.
- Select App registrations, and select the New registration button.
- In the Name field, insert the name of your Mobile Client. Examples: "Mobile AM Prod" and "Mobile AM Test-01".
- Select "Single-page application (SPA)" in the drop-down.
This URL must be the same as when setting up the Azure Mobile Site, described in the article Add the Azure app, taken from "Overview" and added https:// - Select Register and wait for the resource to deploy.
- Navigate to App registrations settings.
- Select API permissions from the settings menu
- Select Add permission > Dynamics ERP (see screenshot 01,02,03,04,05).
- Select Application permissions.
- Select one permission: Connector.FullAccess.
- Select Add permission.
- Select Add permission > Microsoft Dynamics ERP.
- Select Delegated permissions.
- Select two permissions: AX.FullAccess and CustomService.FullAccess.
- In API permissions > Grant consent, select Grant admin consent for... and select "Yes" on the pop-up screen. This step requires you to be an 'Azure Global Administrator'.
- Select Overview from the settings menu.
- Find and copy the Application (client) ID for your mobile client application. You'll use this Application ID to set up the Azure mobile site, described in the article Add the Azure app.
- Go to Manage > Authentication and,
- Under Single-page authentication > Redirect URLs, add the redirect URLs as below (see screenshot 02):
- https://[company] name-dev.azurewebsites.net/work/login/success
- https://[company] name-dev.azurewebsites.net/scheduling/login success
- Under Implicit grant and hybrid flows (see screenshot 06) enable the checkboxes corresponding to Access tokens (used for implicit flows) and ID tokens (used for implicit and hybrid flows).
- Under Single-page authentication > Redirect URLs, add the redirect URLs as below (see screenshot 02):
01: Select '+ Add a permission' in App registrations/Manage/API permission
 01:
01:
02: Select Dynamics ERP
 02:
02:
03: Select Delegated permissions mark Connector.FullAccess click Add permissions
 03:
03:
04: Select Delegated permissions mark AX.FullAcess and CustomService.FullAccess click Add permissions
 04:
04:
05: Grant admin consent for (company name)
 05:
05:

02: Add redirect URLs.
 06: Enable options for 'Implicit grant and hybrid flows'.
Get Dynaway Web Application
Go to LCS.dynamics.com -> your project -> Asset Library and Download the package with the mobile app. Download Dynaway mobile webapp
Configure the Mobile Site
When you've set up the Azure mobile site, created the web application registration, and uploaded the mobile deployment files, the next step is to upload the Mobile Client application files.
- Extract the mobile installation files (from the zip file).
- Before unzipping the contents, be sure to ‘Unblock’ the file by opening the Zip file properties and check the ‘Unblock’ option.
- Locate the web config file, and edit it in a text editor. Go to the <appSettings> section, and change the settings in the table below to your current settings. The table below only shows examples.
|
App setting |
Example value |
Description |
|
ax7Url |
<add key="ax7Url" value="https://contoso-test.sandbox.operations. dynamics.com" /> |
The URL for the Dynamics 365 for Finance |
|
ax7ClientId |
<add key="ax7ClientId" value="b097fac0-deae-4959-9791-53bcb40a9909" /> |
This ID is the application ID of your App registration, and it can be found in the Azure portal by navigating to Microsoft Azure Portal > Azure Active Directory |
|
axDomain |
<add key="axDomain" value="contoso.com" /> |
Define the Active Directory domain name for the users who should be able to log in on the Mobile Client. |
|
ax7Storage AccountName |
|
An Azure Blob Storage account name. |
|
ax7Storage AccountKey |
|
An Azure Blob Storage account key. It is recommended to use the secondary key. This could be the account key of the Azure Blob Storage associated with your |
If the settings 'ax7StorageAccountName' and 'ax7StorageAccountKey' are left blank, there is a limitation of 18-20 MB per file. The IIS service running Dynamics 365 for Finance and Operations sets the limit. We recommend that you do not adjust these settings in a running environment

Step 1: Extracted files
 Step 2: Storage account name and key
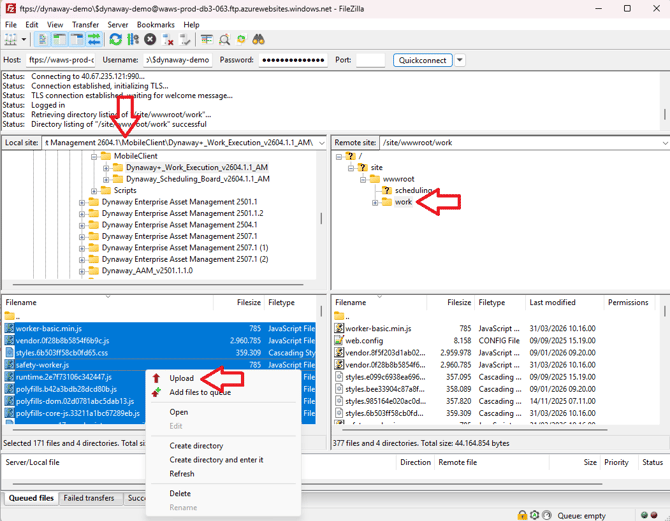
Upload the Mobile Site
Use an FTP client with the specified credentials and URL described in the article. Add the Azure app to upload the mobile client application files.
1. Download the package from LCS, and extract internal files.
2. Go to Azure app service --> deployment center, copy & paste credentials, and connect to the FTP server.
3. Verify web.config file for Dynaway web client: Work execution, Planning board (based on the license)
4. Upload the newest files to the FTP localization.
You can also use Microsoft Azure portal to upload mobile files. Guide: https://knowledge.dynaway.com/upload-mobile-client-files-with-azure-app-services
The files to be uploaded are located in the .zip file. The zip package can be downloaded from lcs.dynamics.com, as shown in the screenshot below.
Drag and drop files to the FTP /work, /plan and /safe directory. Make sure the web.config file is up to date.
 Download Dynaway webapp files from lcs.dynamics.com

Work execution, Planning board and Safe work apps
 Azure app services ftp connection details
 Use the newest web.config file and update values
Upload files to the FTP Server
Module configuration
Navigate to Dynamics 365 F&O Dynaway mobile >Setup > Module configuration.
Application locations- Add direct URL to Scheduling Board App, for example, https://yourappname.azurewebsites.net/scheduling.
- Add direct URL to Work Execution App, for example, https://yourappname.azurewebsites.net/work.
- Scheduling Board > Enabled.
- You can give access to all users (Scope = All)
- Access to a single user (Scope = User)
- Access to User Group (Scope = User Group)
- Change the parameter value to "true".
- Click on the Save button to save your changes.Set access to Scheduling Board.


Initialize Data
All data for the Mobile Clients are kept in a single table that must be initialized before use. In case of the Update to a new version, first, run the Mobile framework cleanup jobs (Dynaway mobile > Periodic > Mobile framework cleanup jobs). After the cleanup batch job ends, select Dynaway mobile > Periodic > Data initialization, and click OK to complete data initialization.
For more information about data initialization, refer to the section Data entities.

